Steps to create rtf Template
Required: For creating XML template you need following things
1. BI publisher.
2. XML file with xml tags.
Step 1: Load XML Data
Open Microsoft word
Navigate to Add Ins -> Data -> Load XML data
Select the .xml file to load. Once the file get loaded successfully it will pop up a message that Data loaded successfully.

Step 2: Insert Fields
Go to Add-Ins -> Insert -> Field

Chose the field and click on insert. And click Insert. In this way design the layout according to requirement.

Sample layout is shown below:
 Step 3: Create Repeating Groups

Another way to add the repeating group is to write xml tags.
For example
<?for-each:G_C_SRC_HDR_ID?>
<?end for-each?>
Step 4: Adding conditional formatting
Navigate to Add-Ins -> Insert ->Conditional Format


Step 5: Print on all pages
There are few requirements where we need to print some objects on each page (header data). This can be done with xml tag as
<?start:body?>
--Body
<?end body?>
Here whatever above <?start:body?> will be consider as header and whatever below <?end body?> is consider as footer. So in this way we can print object on all pages by putting them above the start tag or after the end tag.
Step 6: Validate template
Save your file with rtf format. Before running template need to be validated. Navigate to Add-Ins -> Tools -> Validate template
In case of no error it will print the message as “No error found”. If any error exist you need to fix and then again validate it.
Step 7: See the preview
Navigate to Add-Ins -> Preview -> PDF.
You can also preview output in HTML, RTF, EXCEL and Power Point format as well.
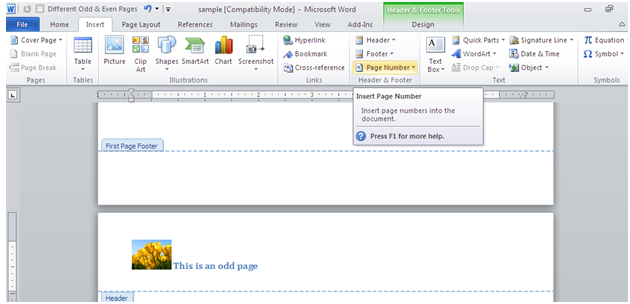
The header/footer on the first page is different from the remaining pages in the output
Navigate to Insert ->Header


It will open the Header and footer Design
Click the checkbox Different First Page

Edit the 1st Page Header

Now go to second page and edit second page header

Save the changes and preview the output.
Output will contain first page header different from rest of the pages.
Page Numbering Starts with 2nd page in generated output
In the above different header option Insert Page Number in the second page header.
Edit header go to 2nd page and Insert Page Number
Insert page Number at current position.

Insert page Number at current position.

go to format page number option
It will open a dialog box
Select start at radio button and insert 0.

Totals: PAGE TOTAL, Grand Total and Page Breaks
Template structure

Template contain Onhand quantity which is numeric in nature
So add field after ONHAND_QUANTITY. Name it as PT

<?add-page-total:PT;’ONHAND_QUANTITY’?>
This PT field will calculate the page total. That calculated page total need to be displayed.
Now create one more field in the template and add the code
<?show-page-total:PT;’999G999D99’?>


<?split-by-page-break:?>
Sample Output

------------------------------------------------------------------------------------------------------------------
